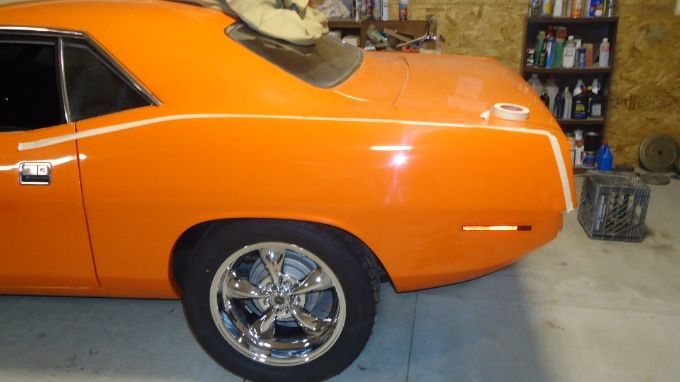
Just got finished putting the Hockey Stripes on the 70. Thought somebody might need this info some time. I have gotten alot of knowledge from this site over my short time here and sometimes don't feel like I contribute much.
First of all. I got my Hockey Stripe from Gary Tooker, a member here on this site. I have applied a dozen or so stripes over the years and this stripe is by far the best material I have run across.
I did steal some of this procedure from another internet source but was able to add several things to make it better. My point is not to use this material as all my own but to help some poor sap get stripes on his car.
The mix I used is one quart of warm water, One teaspoon of dish soap and one capfull of rubbing alcohol.
Step 1. Get the stripes out and lay them flat to let them relax. This will aid in applying them later. My shop was about 65 degrees for the duration of this process.
Step 2. Clean area where the stripe is applied real well with soap and water. Make sure to clean a wide area including on top of the quarter panel so dirt doesn't wash down later and get under the stripe. Then wash the area with deluted alocohol to get rid of any residue from any chemicals that might have been used on the car. Wipe the car down with a lint free rag.
Step 3. Lay a piece of masking tape across the upper body line of the quarter panel and down the rear body line (not the extreme rear by the tail panel but the more subtle one that is further in) This is only to aid in the measuring process later.
Step 4. Measure 3/4" down from the top quarter panel body line and 1 3/4" in from the rear vertical body line. Both of these measurements should be taken from the edge of the tape that was laid down in step 3. Starting at the rear just follow the body line all the way to the door, making marks with a dry erase marker every 2 inches and then down the rear body line as well every couple inches. These marks will be the edge to match the stripe to when applying.
Step 5. Trim the backing of the stripe down to the edge of the vinyl on the top edge. Be very carefull and take your time. One slip and you cannot go back. Try to get within 1/8" from vinyl.
Step 6. With backing paper still on the vinyl, starting at the rear of the car, hold the vinyl up to marks that were made earlier and put a long piece of tape that runs from the top of the vinyl up and over the top of quarter panel. These are hinges that allow you to flip the stripe up on top of the car later. This will need to be done in increments if doing this by yourself. If it is not perfectly on the mark you can go back and move the end of the tape that you fastened to the car after getting it all secured. The upper rear corner (above the call-outs)will not be on the mark but should meet the vertical line and horizontal line as the stripe straightens out. When you get to the front of the stripe (under the quarter window) you will need to use pieces of tape long enough to reach all the way up to the flat edge right under the window. This is to give you room to flip the stripe up as a unit later on in the process(due to the bend in the stripe). (See pic) I made 5 hinges on mine.
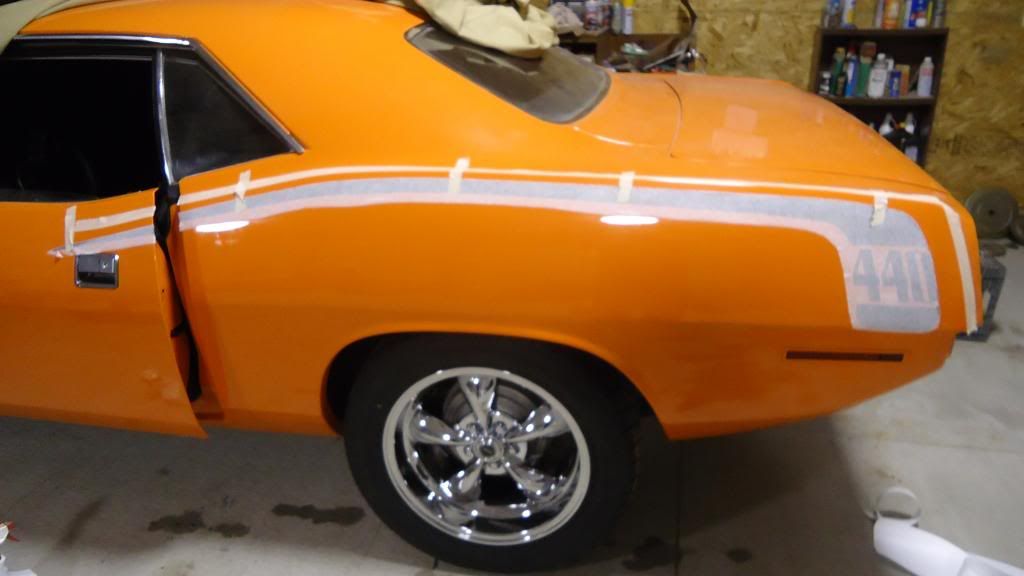
Step 6. The stripe should hang neat and flat on the car. Any repositioning of the hinges should be done now, so the stripe will hang freely on the marks. Step back about 10' and get a good look at the position of the stripe at this time. (see pic above)
Step 7. If it is correct, using the tape hinges flip the stripe up and let it lay on top of the car. Remove backing from stripe, making sure to not touch the adhesive, nor allowing the stripe to bounce back around and stick to anything. At this point the part of the stripe that will be visible after installed will be laying flat against the car and the adhesive side will be pointing up.
Step 8. Spray side of car and the adhesive side of the stripe liberally with mix. Use lots of mix. It should be running down the side of the car.
Step 9. Flip stripe over and down to lay on side of quarter panel. Very lightly position it in place to the marks you made earlier and letting it hang on the pieces of tape you hung it on earlier. Flatten it out using hands and fingers, taking care not to squeeze to much water out from under it yet. (You still might need to reposition it and once the water is out from under it is difficult to move it) The small portion that is on the door should lay down on it own. This is one thing I like about Garys stripe is the small pie shaped piece on the door is one piece with the larger piece that lays on the quarter panel making it very easy to lay down.
Step 10. Step back and look at it and make sure it looks correct.
Step 11. If it is correct take a plastic 2" flexible putty knife and starting in the center (front to back) of the quater panel, starting at the top edge of the stripe and working down in thirds. Angle the putty knife back at a 45 degree angle or more toward the direction you are going and gently start working the water out from under the stripe. Be very gentle and do not use alot of pressure or the stripe will either move or stretch,then you are screwed. You will see the water running out from under the stripe as you go. Go from center of quarter panel to rear of car and then from center to front using same procedure. Do not be afraid to go over this several times. As long as you are gentle and have the putty knife angled it will not hurt anything and you want to be absolutely sure you aget all the water and air out. TAKE YOUR TIME AND BE GENTLE.

Step 12. Take a wooden or plastic roller and gently roll the stripe, again starting at the top edge and working your way down. This will help squeeze out any trapped water and flatten the stripe out on the car.

Step 13. Let this stripe dry for at least an hour or two depending on the temp. I let mine dry for two hours at 65 degrees. The car was dry and the outer paper was dry as well.
Step 14. Starting at the front end (at the door) gently get an edge and starting peeling the outer backing off. Be very gentle when pulling this backing off and peel back at an extreme angle in the same direction you are going. Like you are pulling the tape back onto itself. This will keep the tape from pulling itself out and off the car. Be very gentle and go slow, keeping a close eye on the stripe while peeling the backing off.
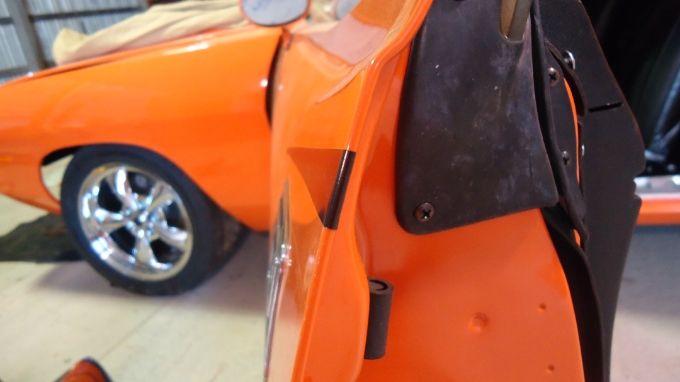
Step 15. Take a razor blade and cut the stripe in too at the door jam joint. Make this cut in the center of the joint leaving a small piece to fold over the quarter panel edge and a small piece to fold over the door jam edge.
The address I referenced for some of this info is below. Like I said I just tried to make it better but between the two I think anyone can do this.
Step 16. After all this I went over my stripe with my roller a few times just to make sure it was stuck good. I had no air bubbles. I have heard you can burst the bubbles and roll them down if you do have some but I have never done that so I cannot testify to that.

 http://www.jonsteiger.com/www/barracuda/HOCKEY_STRIPES/

