360Fish Semi-Pro Touring

Author Topic: 360Fish Semi-Pro Touring  (Read 81796 times)

Offline ragtopdodge

  • Resident
  • *****
  • Posts: 4065
Re: 360Fish
« Reply #45 on: April 11, 2012 - 08:06:05 PM »
Hey ya, if everything fits right, can you get more of those cross-members made and offer them for sale?  I sure could use one!
'70 318-auto Chally 'vert
'71 383-auto 'Cuda 'vert (sold)
06 300c SRT8
04 2500 QCLB 4x4 HO


Offline 360FISH

  • Full Member
  • ***
  • Posts: 705
  • BS23H3B567746
Re: 360Fish
« Reply #46 on: April 12, 2012 - 02:14:20 AM »
Hey ya, if everything fits right, can you get more of those cross-members made and offer them for sale?  I sure could use one!
The fabricator has shown some interest in doing that.  Let me get everything installed and running so I have the driveline angle figured out.  Then we can be sure this is done for real.
I hope to have the car running by Saturday.
1973 ‘Cuda   Semi-Pro Touring
360 SB - 518/OD auto tranny - FAST EZ EFI - Edelbrock Fuel sump - HHR fan
Hella H4 headlights on relays - 97 Dodge Avenger seats - Chin spoiler - Bumpers pulled in to ’72 offset

Build: http://www.cuda-challenger.com/cc/index.php?topic=74674.0

Offline CUDA JAS

  • Resident
  • *****
  • Posts: 2292
  • vroooooom!
Re: 360Fish
« Reply #47 on: April 14, 2012 - 08:45:05 AM »
Wow great project.

Looks like a lot of work, but not a lot of major surgery!!

I look forward to reports of how it works.

This is a swap I am very interested in doing.  Question though, given what I am seeing, why are more e-body guys not doing thsi swap??

Good luck.

Jason
74 'cuda 360/727


Gearhead: car nut, automotive enthusiast, one who loves hot rods, muscle cars, hot trucks, burnin' rubber and neck snapping performance. 

Just call me a gearhead!

Offline 360FISH

  • Full Member
  • ***
  • Posts: 705
  • BS23H3B567746
Re: 360Fish
« Reply #48 on: April 20, 2012 - 03:08:57 AM »
The swap is done and it's amazing!   This has completely transformed the car for me.  I feel like I'll be able to take the Fish on long trips now (Vegas next year... Power Tour some day).

I have alot to write up and share after the Spring Fling this weekend, but I promise a detailed report next week.

I recommend this to everyone because I'm a complete novice and pulled it off in my own garage with my stoneage tools. 

I did have a mentor along the way who coordinated fabrication of the crossmember and gave advice on MANY MANY things I ran into.  If you need any help related to Mopars or this swap contact him.  He has an amazing mind for these cars and is very passionate about keeping them going strong.   Very highly recommended!

Rory Fontana  - Fontana Motor Sports
(818) 641-3512
fontanamotorsports@yahoo.com
http://www.facebook.com/pages/Fontana-Motorsports/198648423567772


More later!

Alan
1973 ‘Cuda   Semi-Pro Touring
360 SB - 518/OD auto tranny - FAST EZ EFI - Edelbrock Fuel sump - HHR fan
Hella H4 headlights on relays - 97 Dodge Avenger seats - Chin spoiler - Bumpers pulled in to ’72 offset

Build: http://www.cuda-challenger.com/cc/index.php?topic=74674.0

Offline ChallengerHK

  • Sr. Resident
  • ******
  • Posts: 7338
  • I'm working on it - No, really
Re: 360Fish
« Reply #49 on: April 20, 2012 - 08:55:12 AM »
Alan, could you post your drivetrain configuration? Displacement, converter stall, rear end ratio?


"She'll make point five past light speed. She may not look like much, but she's got it where it counts, and I've made a lot of special modifications myself."

- Han Solo, Star Wars

Advice Thread - Taking Pictures Of Cars

Offline mopar12372

  • Sr. Member
  • ****
  • Posts: 1163
    • mopartech
Re: 360Fish
« Reply #50 on: April 20, 2012 - 12:24:57 PM »
will that tail shaft bolt to a 727 ?
MOPARTECH.NET ( come over and visit some time )
RESTO PICTURES
http://www.cuda-challenger.com/cc/index.php?topic=71096.30

Offline 360FISH

  • Full Member
  • ***
  • Posts: 705
  • BS23H3B567746
Re: 360Fish
« Reply #51 on: April 20, 2012 - 04:07:49 PM »
Alan, could you post your drivetrain configuration? Displacement, converter stall, rear end ratio?
I hate to be stupid, but I only know generally that I have a high stall speed converter... not sure exactly what speed.

I'm running a 360 cc with 3.73 rearend. 

I have the 1990 2-pin non-lockup 518.

:)

Hope that helps.

Alan
1973 ‘Cuda   Semi-Pro Touring
360 SB - 518/OD auto tranny - FAST EZ EFI - Edelbrock Fuel sump - HHR fan
Hella H4 headlights on relays - 97 Dodge Avenger seats - Chin spoiler - Bumpers pulled in to ’72 offset

Build: http://www.cuda-challenger.com/cc/index.php?topic=74674.0

Offline 360FISH

  • Full Member
  • ***
  • Posts: 705
  • BS23H3B567746
Re: 360Fish
« Reply #52 on: April 20, 2012 - 04:11:56 PM »
will that tail shaft bolt to a 727 ?

Hey Bill...   I don't know for sure but it doesn't seem likely. 

Honestly, you can easily find A518's at pick-a-part or similar yard and go from there.

Alan
1973 ‘Cuda   Semi-Pro Touring
360 SB - 518/OD auto tranny - FAST EZ EFI - Edelbrock Fuel sump - HHR fan
Hella H4 headlights on relays - 97 Dodge Avenger seats - Chin spoiler - Bumpers pulled in to ’72 offset

Build: http://www.cuda-challenger.com/cc/index.php?topic=74674.0

Offline ragtopdodge

  • Resident
  • *****
  • Posts: 4065
Re: 360Fish
« Reply #53 on: April 20, 2012 - 04:37:43 PM »
Hey Alan, can you describe maybe all the things that went wrong?

I take it you got the factory slap stick to work.

Is Rory the guy to contact for the crossmember?


Thanks. -rob
'70 318-auto Chally 'vert
'71 383-auto 'Cuda 'vert (sold)
06 300c SRT8
04 2500 QCLB 4x4 HO

Offline 360FISH

  • Full Member
  • ***
  • Posts: 705
  • BS23H3B567746
Re: 360Fish
« Reply #54 on: April 20, 2012 - 07:10:20 PM »
Hey Alan, can you describe maybe all the things that went wrong?

I take it you got the factory slap stick to work.

Is Rory the guy to contact for the crossmember?


Thanks. -rob

You mean admit to all the dumb things I did?  hahahaa!   

The dumbest thing was misunderstanding some of the older pictures of what to cut and destroying an OD case.  Had to get another one and move the internals... doh!   :eek2:

I have the T-handle shifter.  I don't know if that looks the same when it gets down to the shift-rod under the car.  I didn't have to change anything to get it to work.  Just create a new bracket to support the base of the shift rod.

Yes, Rory has the info on the cross member.  He said some folks in Australia are asking for them because gas prices are sky high.

I'll post more details after the fling (with more pictures) including wiring info.

Happy driving!

Alan
1973 ‘Cuda   Semi-Pro Touring
360 SB - 518/OD auto tranny - FAST EZ EFI - Edelbrock Fuel sump - HHR fan
Hella H4 headlights on relays - 97 Dodge Avenger seats - Chin spoiler - Bumpers pulled in to ’72 offset

Build: http://www.cuda-challenger.com/cc/index.php?topic=74674.0

Offline ChallengerHK

  • Sr. Resident
  • ******
  • Posts: 7338
  • I'm working on it - No, really
Re: 360Fish
« Reply #55 on: April 20, 2012 - 07:13:32 PM »
I can't recall, is your setup manually controlled or vacuum switched?


"She'll make point five past light speed. She may not look like much, but she's got it where it counts, and I've made a lot of special modifications myself."

- Han Solo, Star Wars

Advice Thread - Taking Pictures Of Cars

Offline 360FISH

  • Full Member
  • ***
  • Posts: 705
  • BS23H3B567746
Re: 360Fish
« Reply #56 on: April 20, 2012 - 07:25:56 PM »
I can't recall, is your setup manually controlled or vacuum switched?

As a phase-one I decided to manually control it so I could be sure it was all going to work before going to vacuum and oil pressure switches.  I'm going to stay manual for a while.  Note: mine is non-lock-up.  It makes the entire thing easier to setup.

I ended up building a Radio-Shack switch into the T-handle itself.  Super easy and it works great!
1973 ‘Cuda   Semi-Pro Touring
360 SB - 518/OD auto tranny - FAST EZ EFI - Edelbrock Fuel sump - HHR fan
Hella H4 headlights on relays - 97 Dodge Avenger seats - Chin spoiler - Bumpers pulled in to ’72 offset

Build: http://www.cuda-challenger.com/cc/index.php?topic=74674.0

Offline ChallengerHK

  • Sr. Resident
  • ******
  • Posts: 7338
  • I'm working on it - No, really
Re: 360Fish
« Reply #57 on: April 20, 2012 - 08:44:56 PM »
You know I want to see that, right?  :bigsmile:


"She'll make point five past light speed. She may not look like much, but she's got it where it counts, and I've made a lot of special modifications myself."

- Han Solo, Star Wars

Advice Thread - Taking Pictures Of Cars

Offline CUDA JAS

  • Resident
  • *****
  • Posts: 2292
  • vroooooom!
Re: 360Fish
« Reply #58 on: April 26, 2012 - 01:37:45 PM »
 :popcorn: :popcorn: :popcorn: :popcorn:
74 'cuda 360/727


Gearhead: car nut, automotive enthusiast, one who loves hot rods, muscle cars, hot trucks, burnin' rubber and neck snapping performance. 

Just call me a gearhead!

Offline 360FISH

  • Full Member
  • ***
  • Posts: 705
  • BS23H3B567746
Re: 360Fish
« Reply #59 on: April 28, 2012 - 01:30:53 AM »
Okay...  here is the first part of the write-up...  I'll keep adding more as I get it done.  Hope it helps someone...
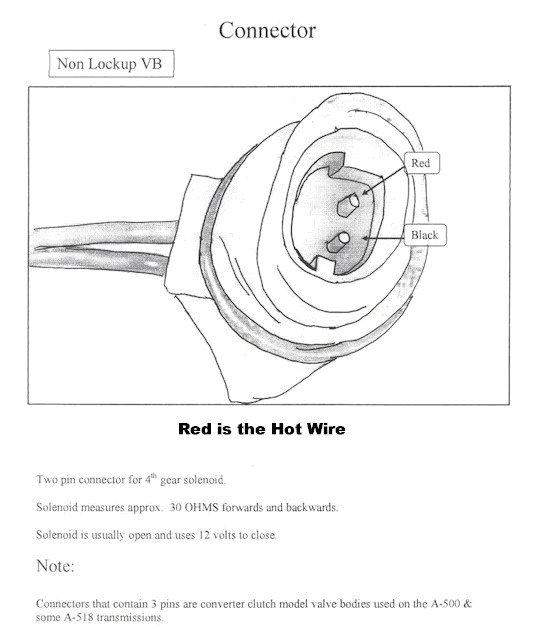
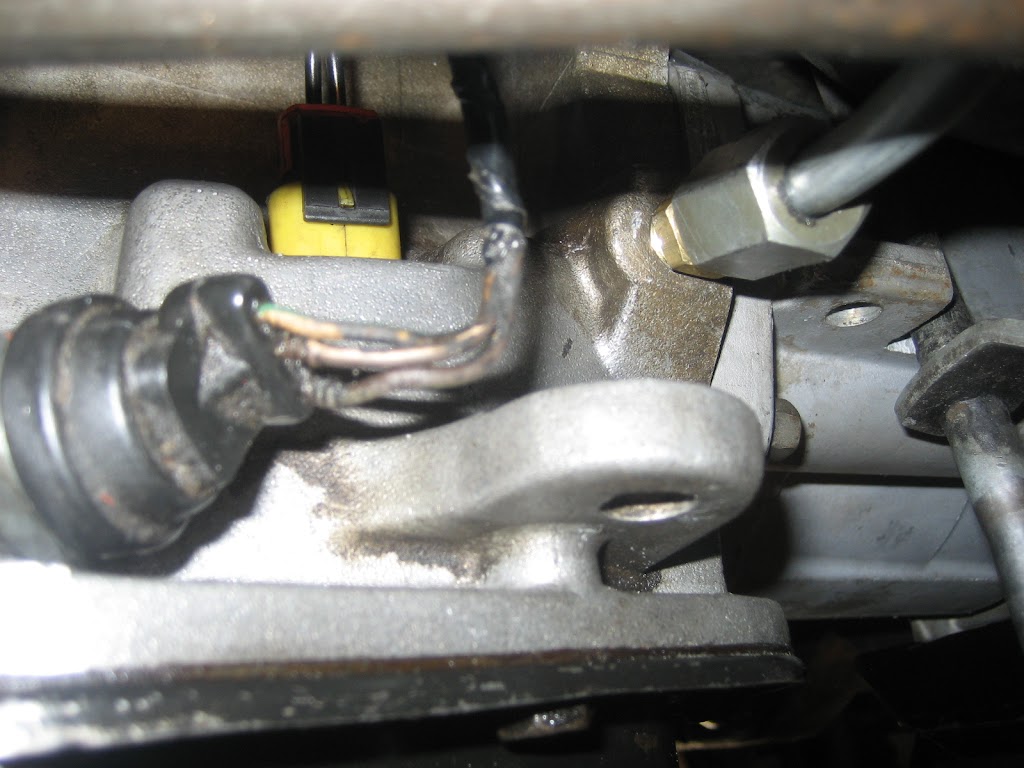

Wiring the beast
Note 1: My tranny is the non-lockup version and has a two pin OD socket.  Later units will have a three pin socket to wire up.  There are two pins in the yellow socket… 


Note 2: I’m using a manual toggle switch to control the OD unit.  I decided to wait on trying to use pressure switches.  So far I’m really happy with this setup.

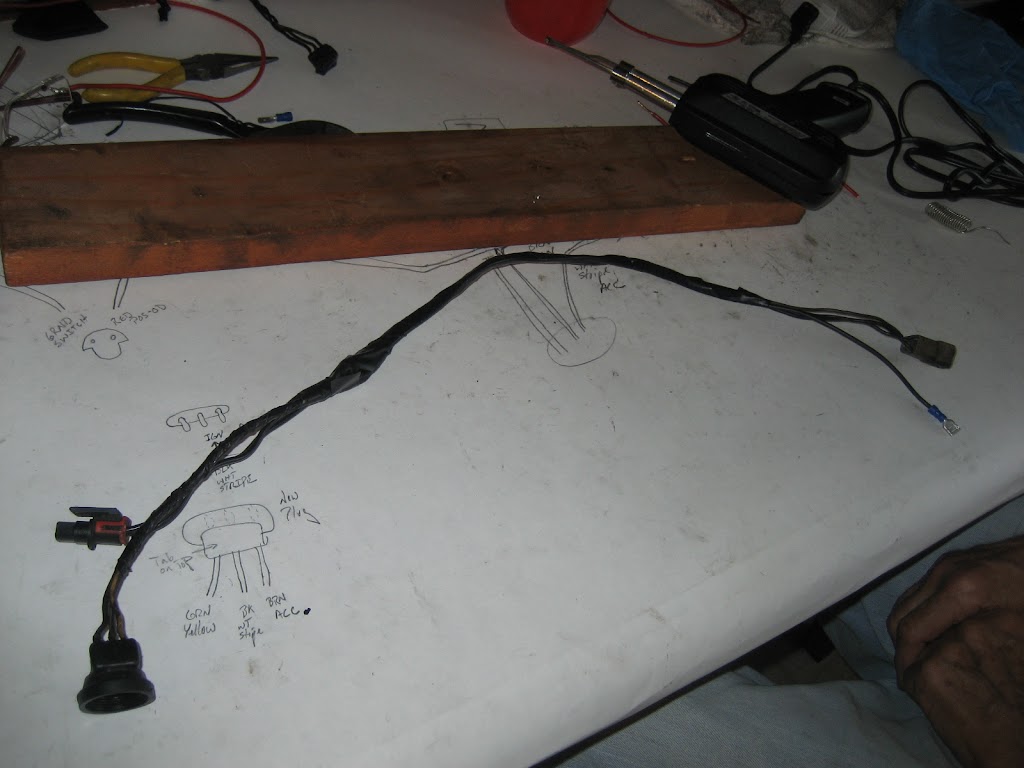
You need to find a two pin plug to fit the socket on your transmission.  I found them at pick-a-part on 1990’s (maybe newer?) jeeps and dodge trucks.  They are used to plug in fog lights and other electrical at the front of the truck.  Get as much length of the wire as possible and cut it.  I bought two for a $1 each!

To control the OD unit you need an ignition switched source which runs to the positive side of the OD plug.  Luckily you have one about 6 inches away in the center wire of the three wire neutral safety switch.  Splice into that middle wire and run it to the positive side of the plug.


On my car it was really easy to unplug the neutral safety switch and unplug the other end at a socket sitting a few feet away up along the body toward the engine bay.  I took the wiring assembly inside and worked on it there.  Be sure to splice far enough away from the plug to give yourself room to fix errors.  It’s best to solder these splices.


The negative side of the plug should be extended to run the length of the wire assembly and terminate at the same place the rest of the assembly terminates.  Crimp on a connector at that point.


The ground wire will ultimately run to a ground to complete the circuit.   This length of ground wire will be where you put the switch.  When the switch is on, you have a circuit running to ground which allows the positive wire to feed power to the OD unit.

Both plugs in place…


I ran about 5 feet of wire from the ground wire connector (the assembly you spliced into) up through the firewall at a point near the parking brake and fished it under the carpet toward the console.  The console is easy to remove (3-4 screws) revealing a spot directly in front of the shifter where the wire can be fished up along the front of the shifter rod that supports the T-handle.  If you bring the wire thru the side of the shifter it will get caught up in the mechanism, not allow you to put the shifter all the way in park and damage the wire (doh!).


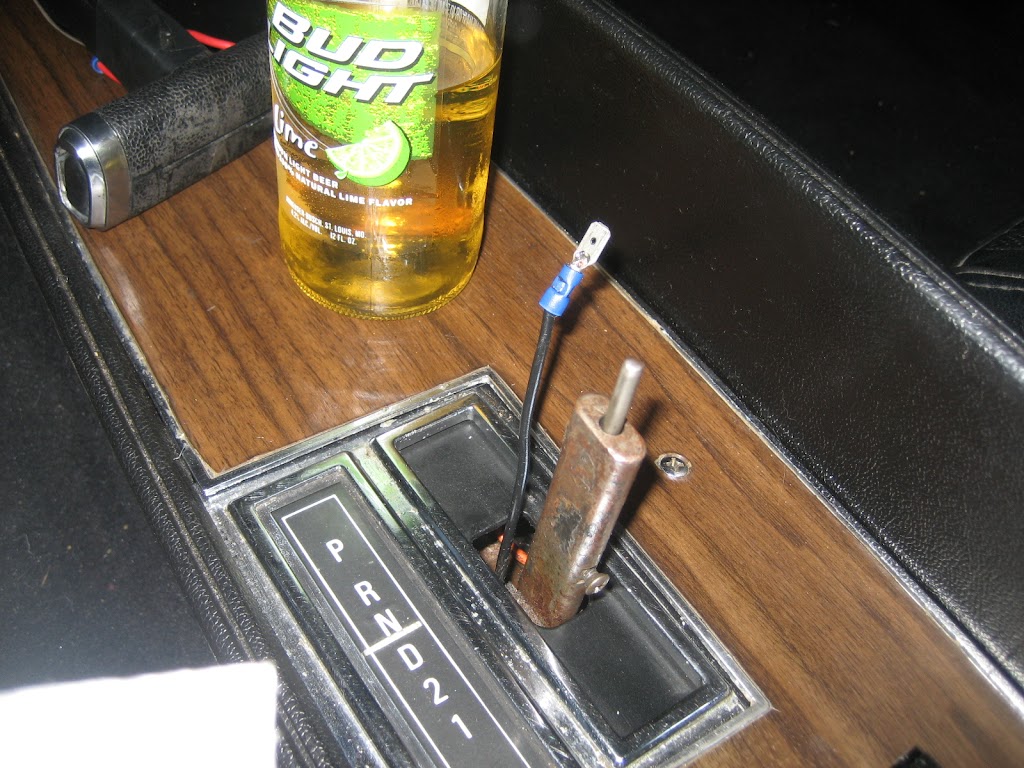
The idea is to have this wire connect to a switch on the T-handle and from the switch the wire will terminate to ground connected to the screw that attaches the T-handle to the shifter.  (I did need to find a slightly longer screw…) The dang thing works too!

I set it up so I could disconnect the T-Handle wires using simple connectors.  Some day I’ll solder these for a cleaner look.  I used 16 gauge wire for this…ended up using red wire when I should have run black, etc. just because…

Shifter (T-Handle modification)

Take your T-handle off the car and take it apart.  Mine was practically falling apart anyway so this way easy.
The Radio Shack mini toggle fits a space in the right front of the handle without having to widen anything inside.  Find a drill bit that fits (Radio Shack says ¼” hole) and carefully make a hole out the front of the handle.  The switch should stick out through the hole enough to thread the included nut on to hold the switch in place.  Mine would only do so if the switch was up one way vs. the other… just turned it over.

SPST High-Current Mini Toggle Switch Model: 275-324   $ 3.19


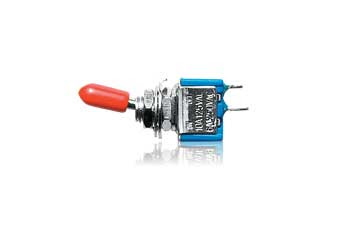
The switch sits between my right pinky and the next finger in and toggles left/in (on) to right/out (off).  Not up or down, which would be odd.

Once that is set, remove the switch and solder a short piece of wire to each terminal on the switch.  You might want to carefully bend the terminals on the switch away from each other to give a little room for soldering.  One of these wires will connect to the screw at the base of the handle (crimp on a round connector) so give it only that much length,  The other will connect to the wire coming up from the front of the shifter. (see previous section on wiring).

You will need to open up a small gap at the bottom seam of the T-handle to make room for the two wires to exit the handle.  I made the hole in the back half piece of the handle because the wires would exit there more easily.  People have mentioned that using ribbon cable would be better for this…  maybe next time.


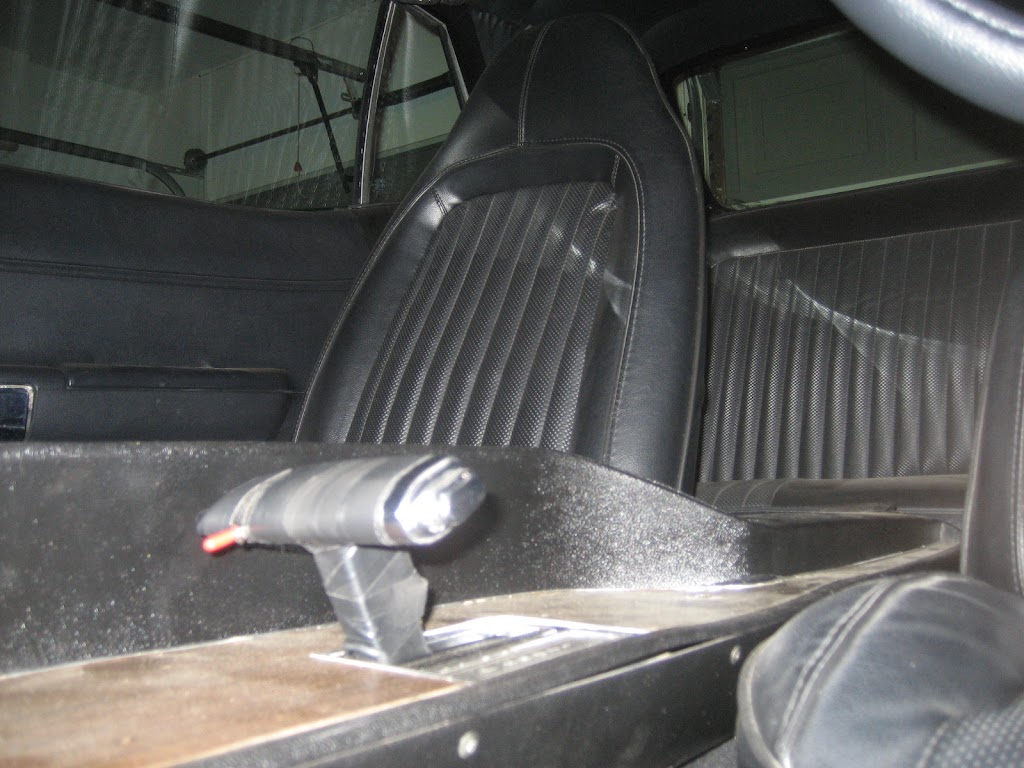
I did not solder the connections as I wasn’t sure it was going to work.  Once it was all working I simply wrapped the T-handle in electrical tape.  Someday I’ll come back and clean this up and wrap the handle in leather, etc.

Ugly - yes


Wrapped to hide the ugly…


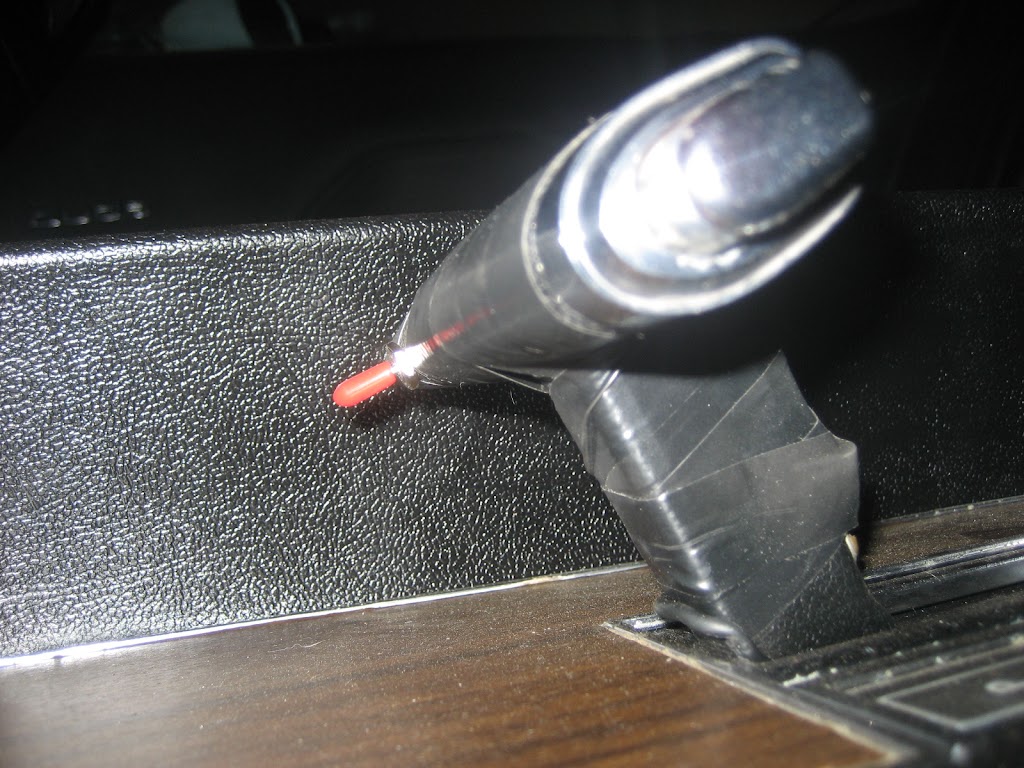
This switch has worked better that I ever dreamed so far.  It is easy to use but small enough most people don’t see it and it really fits my hand well.  Pretty cool for a cost of $4.
 
« Last Edit: April 28, 2012 - 01:49:48 AM by 360FISH »
1973 ‘Cuda   Semi-Pro Touring
360 SB - 518/OD auto tranny - FAST EZ EFI - Edelbrock Fuel sump - HHR fan
Hella H4 headlights on relays - 97 Dodge Avenger seats - Chin spoiler - Bumpers pulled in to ’72 offset

Build: http://www.cuda-challenger.com/cc/index.php?topic=74674.0